I can never leave well enough alone. If 2 GB of RAM in my MacBook Pro is good, 4 GB of RAM would be better, right? Well, as a matter of fact, yes. So I set out to expand the memory of my new Macintosh, and have a few tidbits to share.
Can your MacBook Pro be expanded?
As I understand it, there have been a total of two “releases” of Intel-based MacBook Pro. The first came out late in 2006 and was in distribution until approximately June of 2007. That version used a version of the Intel chipset that, for reasons that remain unclear to me, could only address 3 GB of RAM. Note that you could *install* 4 GB, but that the machine itself wouldn’t actually use the memory above the 3 GB boundary due to mapping conflicts. I believe this first version of the MacBook Pro came with 1 GB of RAM standard.
Apple quietly updated the MacBook Pro during the June time frame of 2007. The new models use the Intel “Santa Rosa” chipset, and can now support up to 4 GB of RAM. These newer MacBook Pros come standard with 2 GB of RAM, with of the two slots in the machine filled (I.E.: two 1 GB SODIMM chips).
In either case, whether you have the “old” pre-June 2007 MacBook, or the “new” post-June Santa Rosa based MacBook, you can add RAM. The difference is how much. To get 3 GB of RAM in the old machines, you can either buy 1 x 1 GB SODIMM and 1 x 2 GB SODIMM, or you can buy 2 x 2 GB SODIMMs and “waste” half of the second DIMM. If you have a newer Macbook, the choice is obvious: 2 x 2 GB SODIMMs. The cost of the compact SODIMM memory components has come down a lot lately, so I don’t really know whether it makes that much difference.
The component type you want is a PC2-5300 or PC2-5400 DDR2 667 SODIMM. I bought a matched pair of OCZ PC2-5400 DDR2 667 2 GB components for just over $200 for the pair. To me, that seems very reasonable.
Now that you have the RAM, how do you install it? I found this really handy site called iFixit.com that has nice pictorial guides for upgrading/replacing parts in the MacBook Pro and other Macs. They also indicate what tools you need, although I’m not sure they have that exactly right.
According to the IFixit site you need a #0 Phillips screwdriver, and a Torx T6 driver to take apart the MacBook Pro case. To get at the memory, all you really need is the #0 Phillips. Or that’s what the IFixit site says. I went to Canadian Tire and bought a #0 Phillips. Fortunately for me I also had to buy a precision driver kit in order to get a Torx T6. That precision driver kit included #0, #00, and #000 Phillips drivers. And miracle of miracles: they had just dropped the price on it from $25 to $17 due to the increasing value of the Canadian dollar: hurray!
The tools of the trade: #00 Phillips head (in the bit set) and a pair of 2 GB PC2-5400 SODIMM chips
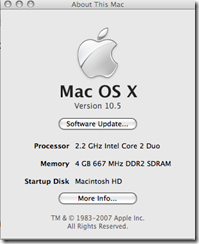
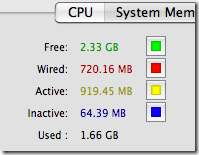
When I went to remove the memory cover on the MacBook Pro I found that the #0 Phillips didn’t fit…the #00 fit perfectly. The total time to perform the upgrade was perhaps 10 minutes including powering off and later restarting the computer. And just to confirm that it worked as planned…
The first image is from “About” under the Apple menu, the second is from the Activity Monitor application. Both add up to 4 GB of physical RAM, which is satisfying to see.
My next project of this type will be upgrading my hard disk…think I can hold off on that until after Christmas at least? 🙂


